Saturday, 27 July 2013

Fence Post #5

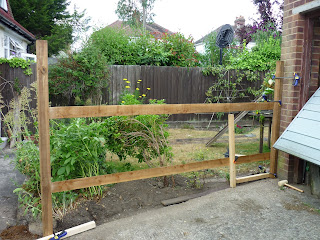
The post and rails for the second section of fence are now virtually complete.  The post attached to the garage wall had to be cut at an angle along its length, like the one by the house.  This then allowed the rails to be measured in situ as before.


It also took a while to take down the old fence and remove the stump of the gate post from the metal post holder sunk into the concrete.  A combination of drilling and chiselling got it all out eventually, and both post holders were cleaned up and given a coat of hammer enamel paint.

I reckon to give everything a coat of wood preservative before final installation, especially as the post bottoms and insides of the joints hopefully wont see daylight for another 20 years plus!

Friday, 19 July 2013

Fence Post #4

The heatwave has somewhat discouraged lengthy outdoor work, but there's still some progress to report.

The post and rails for the first section are pretty much done and tested in situ.


The aris rail tenons were fitted to the mortises on the post at the wall end, and the gate post clamped in place to measure the final length of each rail.


The tenons are cross-cut with a hand saw and then split and pared with a 1" chisel.


I'm pleased with the good fit of the rails and that everything is pretty level, plumb and square!  The finished height will be reduced by about 6" once the gate post is driven home, and the wall post is cut down accordingly.  The render needs levelling out and a lick of paint before fitting the post.


A little of the roughness of the sawn timber has been removed with a Stanley #80 scraper plane, but not so smooth that the final timber treatment would have trouble penetrating the surface.

Wednesday, 10 July 2013

Fence post #3

A little distracted by the start of the Ashes cricket today, but making steady progress.  I've figured out and obtained all the necessary timber, with the longer stock delivered this morning.

To make a smarter job, and practice some woodworking skills, I'm going to mortice the aris rails into the posts rather than using big shiny fixing brackets.  In theory they should look something like this:


The first post, to be secured to the house wall, is completed:


The back face had to be cut at 70 degrees to account for the angle between the fence and the house wall.  


Cutting and planing 6' x 3" of timber with a hand saw and plane was good exercise!  The next post and aris rails should be easier by comparison.


Friday, 5 July 2013

Fence Post #2

Lots of planning and design work the last few days.  I think I've settled on a featheredge board for the lower part, with a custom made trellis above.  To get a better visualization of this I put the whole thing into Sketchup:


The exact design of the trellis and gate is still work in progress, but it shouldn't be too difficult to come up with something a bit more interesting than the norm.

I've dug out the ivy roots and have altered the existing fence rails to give a feel for the height and alignment of the new design in situ.


Next stop the timber yard...!


Monday, 1 July 2013

Fence post #1

So finally a bit more progress to report on the back fence.  After fighting the ivy, for what seemed like 15 rounds, I think I've won by a technical KO.

Now you see it...


...now you don't...


On a roll, I started to dismantle the fence.  Given that I'm looking to use it as a template for a fairly direct replacement, I refrained from the 'sledgehammer approach'.  


This allows me to still have a fence that will be quick to come down once I get the timber for the new one.  The horizontal batten is just that - I'm thinking to have the top of the fence level - we'll see...